How to Make Your Own Ethernet Cables
Ethernet cables are one of the most important tools in any home or office network. Whether it’s CAT5e or CAT6 (Don’t know the difference? Check out our blog post HERE to learn more) Ethernet cables give us fast, dependable, and convenient connection to the internet, allowing us to interface with people from around the world and speed up our business interactions. But sometimes you may need a custom length of cable, not easily found with connectors, or perhaps you’ve accidently damaged an existing cable connector and have had to remove it. In this unfortunate event, TXM has the information you need to make your own Ethernet Cable.
Tools:

Step 1:
First you’ll need to strip the cable jacket to expose the multicolor wiring inside. We recommend starting with a cable that’s just a little longer than you need, and strip around an inch of the jacket away from the end of the cable. Inside you’ll find several twisted pairs, each containing a solid and striped wire, and in some instances a white string. Make sure that you haven’t damaged these wires in the process of stripping the jacket away; if they are damaged, cut the end of the cable and try again (this is why you’ll want a slightly long cable). The white wire can either be tucked alongside the remaining cable jacket or cut away, depending on personal preference; its purpose is simply to strengthen the cable.

Step 2:
You’ll now want to untwist each of these pairs, but be sure to keep them as organized as possible. The important part is to have each wire be mostly straight, and the same length. Try to remove any kinks the wires may have from being twisted together. If your wires are different lengths, don’t sweat it too much, you can trim them in a later step.
Step 3:
Now is the trickiest part. You want to arrange the wires based on which typed of cable you want to make. The two categories set for by the Telecommunications Industry Association (TIA) are the T568A and T568B terminations. These shouldn’t typically be used in tandem, so we recommend that you find whichever your home or business uses and stick with it. The only difference between the two physically is the order in which the internal wires are arranged. We have a handy table made up for each. The example photographs follow T568A standards.
| Pin Number | T568A Coloring | T568B Coloring |
| 1 | Striped Green | Striped Orange |
| 2 | Solid Green | Solid Orange |
| 3 | Striped Orange | Striped Green |
| 4 | Solid Blue | Solid Blue |
| 5 | Striped Blue | Striped Blue |
| 6 | Solid Orange | Solid Green |
| 7 | Striped Brown | Striped Brown |
| 8 | Solid Brown | Solid Brown |
You’ll want to line these up closely together, and ensure that they are all the same length—a half inch is optimal. You may cut them with scissors to ensure this length, but make sure that the cut leaves the end of each wire clean and not frayed, or damaged in some other way.

Step 4:
Keeping the wires flat, insert them into the RJ-45 plug; the flat surface of the plug should be up, with the lever used for release facing down. The wires will all need to reach to the back of the plug to make contact with their individual pins, so don’t be afraid to push gently until the wires won’t move anymore. NOTE: The cable and the plug type will both need to be CAT5e or CAT6, so ensure that you have the correct plug for your cable.

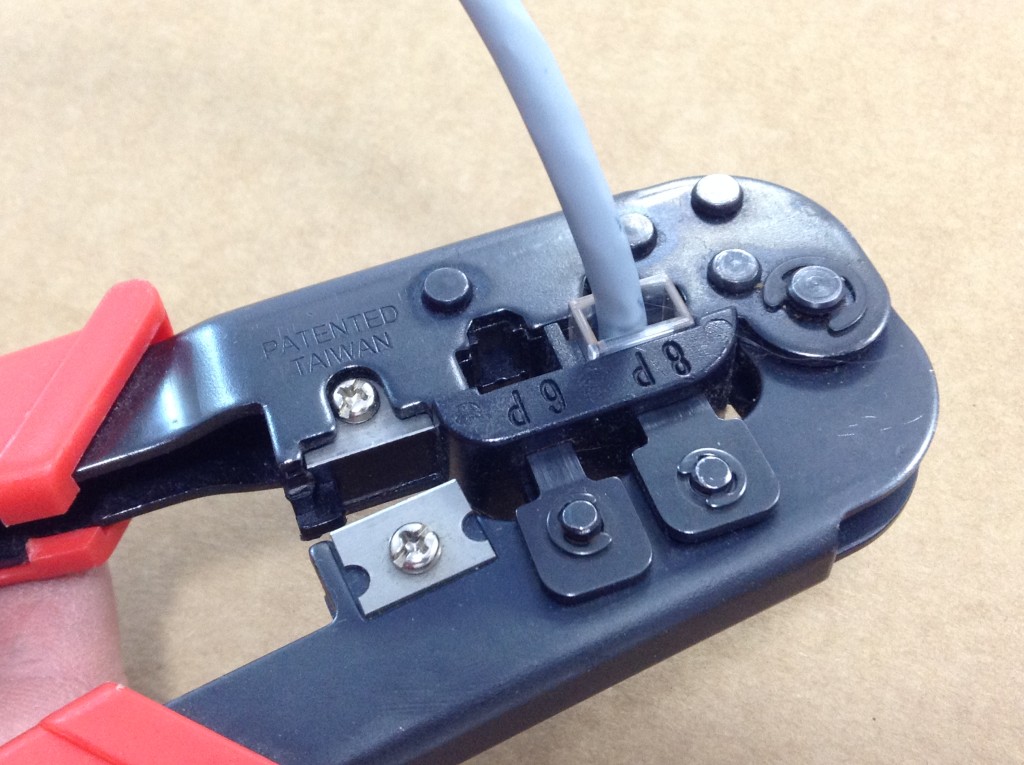
Step 5:
Now comes the easy part, use a crimping tool to cinch the plug down onto the wires, to ensure that they will not slip away. Repeat steps 1-4 on the other side of the cable if necessary. Be mindful that both sides follow the same TIA termination type, whether T568A or T568B. Congratulations! Your CAT5e or CAT6 cable is complete. There is just one more step remaining.
Step 6:
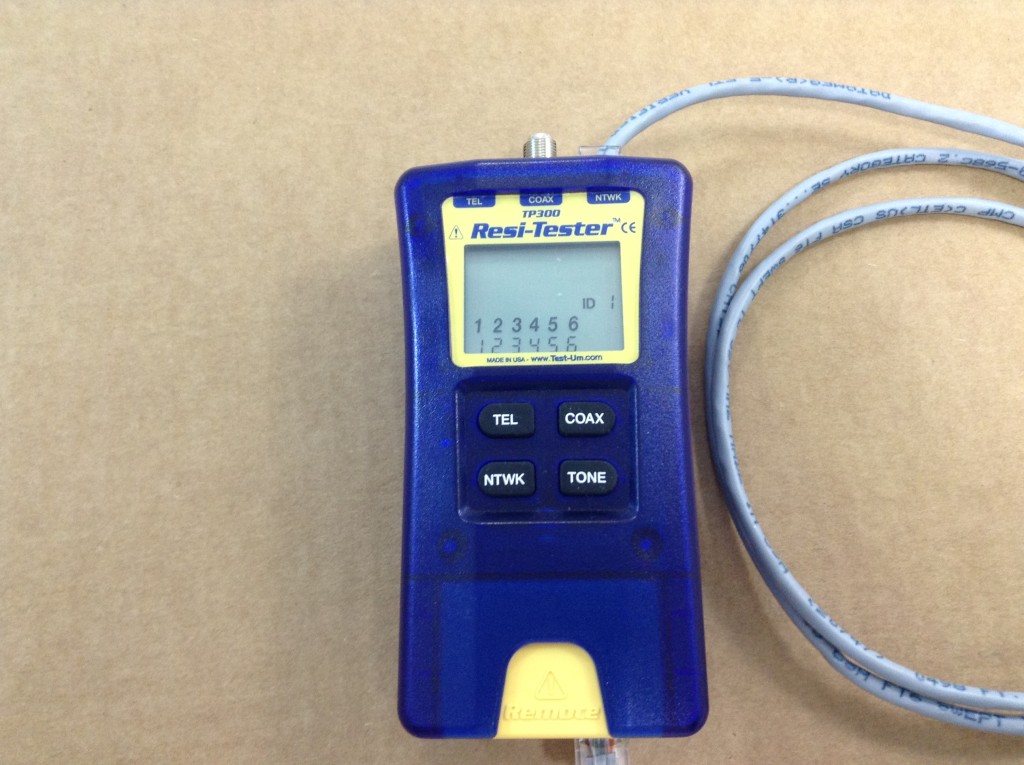
Test your cable! Sometimes accidents happen, and the freshly created cable may not work properly. Perhaps the wires didn’t reach all the way to the pins when placed in the plug, they were damaged during jacket stripping, or they were placed in an incorrect order. Regardless of the way, a faulty cable will certainly be a nuisance down the road, and a simple test can ensure that your homemade CAT cable is working properly before installation. There are numerous cable testers available online that can give immediate readings on the viability of your creation. If everything checks out, your cable is ready for installation.
For your CAT5e and CAT6 needs:
Visit our website at www.TXMSTORE.com for easy access to instant purchasing. We offer same day shipping on all stock items.
Recent Posts
-
Times Microwave’s new LMR Tool Kit
TXM Manufacturing is now offering Times Microwave’s new LMR Tool Kit. This new kit includes all tool …8th Feb 2022 -
Opti-Tap and Opti-Tip Cables
TXM is now offering Opti-Taps and Opti-Tips to our customers. The Opti-Tip and Opti-Tap fiber cable …11th Jan 2022 -

Bus Bars for Telecom rooms
In a typical Data Center, you will often have many different ground bars in use through out the fa …12th Nov 2019